

While Markdown is a lightweight markup language that is widely used for creating formatted documents with plain text, there may be instances where additional flexibility and interactivity are required. This is why DocsKit supports MDX (Markdown with JSX). MDX is an extension of Markdown that allows the embedding of JSX (JavaScript XML) components within Markdown documents. This powerful combination enables the seamless integration of static content with dynamic elements, such as interactive code snippets, data visualizations, or even embedded videos.
To begin writing your documentation with DocsKit, knowing basic Markdown syntax is enough.

We provide a set of templates designed to help you structure your content effectively and maintain consistency. These templates are available in MDX format, and they serve as valuable resources for kickstarting your documentation. The decision is up to you when you’re crafting your documentation: you can start from scratch, use our templates, or even get inspired and create your own templates.
By adhering to the Markdown format, embracing MDX for interactivity, and leveraging our templates, DocsKit’s Docs as Code approach empowers you to create documentation that is both user-friendly and dynamic, ensuring that your documentation remains accessible and engaging.
You have the flexibility to choose any text editor that supports Markdown, making it convenient for you to work with.
Tip: For the best experience when working with documentation, we recommend using Visual Studio Code. This editor not only supports Markdown but also offers numerous extensions that simplify the process of writing and editing documentation. Some of these extensions include Markdown syntax highlighting, MDX preview, and it even integrates Git commands, allowing you to make commits directly from the editor.
Think of your documentation as individual pages, each covering a specific topic. To create a new topic, specify a unique "slug" in the markdown frontmatter. This slug defines the page's URL and navigation position. Also, provide a meaningful title in the frontmatter; it becomes the menu item name in the navigation.
Frontmatter is metadata that you have to include at the beginning of an MDX file when working with DocsKit. It is enclosed by triple dashes --- and is used to provide additional information or configuration settings for the MDX document, such as titles. Slug refers to a short, URL-friendly, and human-readable string that represents a piece of content.
---
title: Navigation
slug: documentation/navigation
---
When adding topics to your DocsKit site, they will appear in the navigation in alphabetical order by default. If you want to change the order, you can do so by assigning a numerical prefix to the topic's title.
For example:
00-this-topic-comes-first.mdx
01-this-is-the-second-topic.mdx
By using numerical prefixes, you can control the order in which your documentation topics appear in the navigation, but the numerical prefix itself won’t show up anywhere on the rendered site.
It's important to distinguish between the top-level navigation and the sidebar navigation in your DocsKit site. Top-level pages are prominently featured in the main navigation menu, located at the top of your site. These pages represent high-level sections or categories of your documentation, providing users with easy access to essential information. On the other hand, sub-pages, often related to or nested under top-level pages, are listed in the left sidebar navigation. The left sidebar navigation serves as a secondary menu that helps users navigate within specific topics. The right sidebar navigation allows users to jump to specific sections inside a page and is automatically generated from the headings on that page.
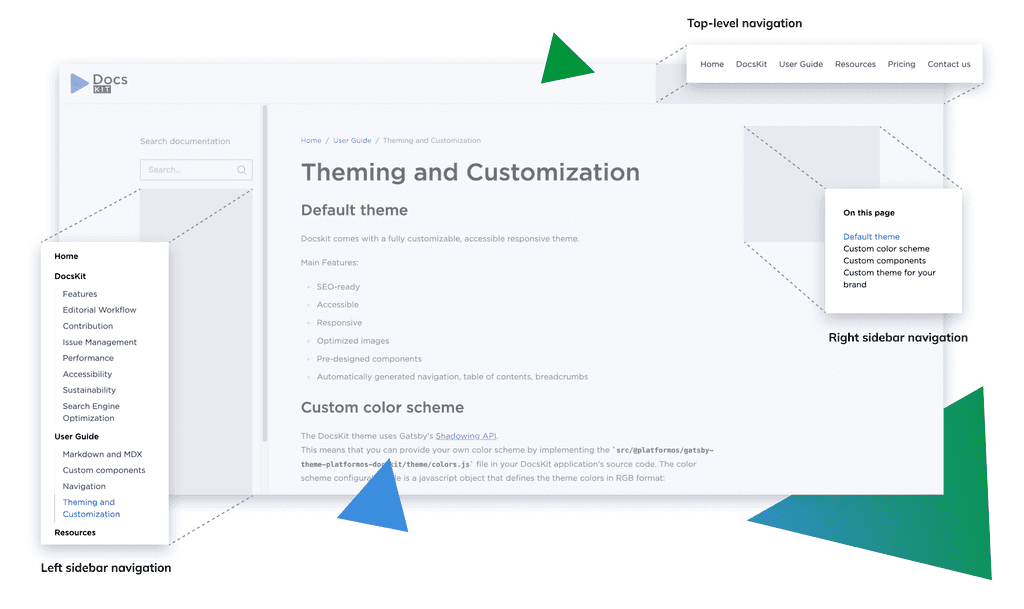
This hierarchy ensures that users can seamlessly explore both broad categories and more detailed content, enhancing the overall accessibility and organization of your documentation.
When creating your content, you can include images using the basic Markdown syntax:
If your image is in the same directory as your .mdx file, it should be the following:
 └── src
├── docs
└── Topic1
├── page1.mdx
├── page2.mdx
└── image.pngTip: If you plan to use more than five images, it's advisable to organize them in an assets folder within your topic directory. Here's an example directory structure:
└── src
    ├── docs
        └── Topic1
           └── assets
        	   ├── image1.png
        	   ├── image2.png
        	   └── image3.png
        	   ├── image4.png
        	   ├── image5.png
        	   └── image6.png
   	     ├── page1.mdx
   	     └── page2.mdx
In this case, when you're working on the content of "page1.mdx," you should reference the images using the following path and syntax:
This approach ensures that your images are well-organized and can be easily referenced within your documentation.
On top of formatting your text with Markdown and using images, you can also add custom components to your topics, such as
- Messages (4 variants: info, success, warning, error)
- Cards
- Styled CTA Buttons
- Grids
If you're planning to use DocsKit for your site, it's important to use a style guide. When you request our help to create a DocsKit site, we'll work with you to make a customized style guide that suits your needs. If you're using the open-source version of DocsKit, we recommend creating your own style guide. Having one can make your documentation more consistent, clear, and professional, benefiting both creators and users. By following a well-defined style guide, you can maintain a high level of professionalism and readability in your technical documentation. It not only streamlines the content creation process but also enhances the overall quality of your documentation, making it more accessible and user-friendly.
-
Start working on your documentation by forking the repository on GitHub.
-
Create or open the .mdx files in your preferred editor.
-
Write the documentation or make the necessary changes.
-
Save your changes.